Thursday 22 April 2010

Dragonfly Part Two

This is another version of the dragonfly stamped card. I had some of the embossed dragonflies from the other day still left over.

I cut round one completely and the other one I just cut out the wings with the idea of mounting them on top with silicone glue. It certainly is fiddly cutting them out!

I stamped some co-ordinating card with the same dragonfly stamp and silver ink. I joined the stamped card to a lighter shade and covered the join with paterned paper and silver ribbon.

Really all that is left to do is stick the dragonfly on. And that's it really!


Tuesday 20 April 2010

Cat & Dog

This card was made with some bubble stickers I bought from Poundland. It's definitely worth going there for cheap crafting bargins.

When I stuck the sticker on I noticed that the colour on the dog's bow had worn a little. To hide this I covered with glossy accents glue and some fine pink glitter.

I used some sticker sentiments and embellished with some silver stars to match. All in all, really easy!


See you soon,
Sarah
x

Monday 19 April 2010

Baby Girl Card

I made this card for a lady at work whose cousin had just had a little baby girl. I recently bought some baby themed embossing folders, so it was a good excuse to use them again.

Using some nesting square punches I punched three squares in two different pinks, and used the smallest square for the baby feet.

I then used the same pink card with the Xcut heart border punch, ribbon and some pink gingham paper to make the sentiment. I wrote Welcome Baby Tilly in hand and finished with some pink buttons.

The final touch was to use pearl nail gems to embelish the embossed feet.

This was all quite simple and quick.


Sunday 18 April 2010

Dragonfly Card

I have had a busy few days, so I have not been able to make anything or upload anything to the blog.


I wanted to practise using embossing powders as I have not used them much at all. I am quite pleased with the results as in the past I think that I have held the heat gun too close and the paper has gone a bit warped as a result.

I allowed the dragonfly to cool and then cut it out with some very small scissors!

Using some co-ordinating cor'dinations card I puched three squares and gave them a distressed look.

Using the lighter cor'dination colour I punched a border and wrapped with some cream ribbon.

I chose a co-ordinating Do Crafts paper and matted it to the lighter card stock. And then stuck the squares and border to the card.

I was thinking of sticking a sentiment on the card, but thought that it would look too fussy.


This is a closer view of the dragonfly.
See you soon,
Sarah
x

Wednesday 14 April 2010

Happy Birthday Cat


Another really quick card. I've used a free stamp I had from Cardmaking and Papercraft and coloured the image with Papermania's watercolour pens.
I die cut the stamped cat and as I had chosen a green theme I matted it onto pale green card.
I layered green card onto a ready made card blank and topped off with My Mind's Eye green spotty paper.
Really all that was left to do was to stamp a sentiment and embellish with some pale green gems.
I won't be posting anything tomorrow, so see you on Friday!
Sarah
x

Tuesday 13 April 2010

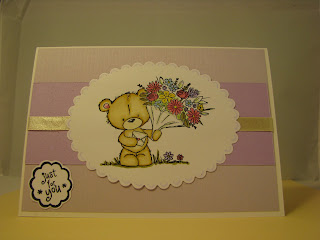
Just For You Bear


This is another easy card! I have used the same stamp that is in the blog from a few days ago and have used Papermania pens to colour.
I have used one of the lilac pens to draw freehand around the diecut shape - although this has not shown up that clearly on the card.
Simply layer two different tones of card on the base and finish with a ribbon.
I have stamped another sentiment from the Hero sentiments set.
That's really all there is to it!
Sarah
x

Monday 12 April 2010

Tree and Bird Card

I did not design this card - I think that it was in the latest copy of Simply Cards and Papercraft. But, it is not something that I have tried to do before, so thought that I would give it a go.


The magazine had a template that I traced onto a white card blank. I used a craft knife to cut out the tree. It was easier then I thought!


I lined the back of the card with a green floral paper I had, and then edged the card with a yellow sticky border. That was quite tricky to get sraight, and you can see that it ended up a bit wonky.

I then used some of the same green floral paper and plain green card to use as the grass. I then used a leaf punch to give the tree some leaves.


This is the finished card - I stuck some bird bubble stickers from Accessorize and placed them on the branches. The magazine had used bird stamps, but I didn't have any the right size. I think the stickers are cute anyway!
This is a close up of a butterfly sticker I stuck on to hide some glue I accidently blobbed on the card! I really didn't want to waste the time I had spent on this.
If something doesn't work out how you wanted - don't throw it away, there may be something you can do to salvage it.
See you soon,
Sarah
x

Sunday 11 April 2010

Milton Bear Thank You Card

This card is really simple, so I won't spend a long time on this post.

The stamp is a really cute bear which I coloured with Papermania watercolour felt pens. The are ok at blending, so I am quite pleased with the results. I have then cut him out.

I have stamped a sentiment which is from a Hero stamps set of different sentiments, and have matted this onto purple paper.

The backing paper is from the newish capsule collection from Papermania. As this is an A6 card I had some paper left over. I wanted to add another element as it seemed too plain, so I rounded the corners and matted onto the same purple I use for the sentiment.


I thought that the card needed an extra element, so I die cut a couple of flowers from a Cuttlebug flower set. The centre of the flower is a purple brad.

All in all very simple. I tend to stamp a lot of images in one go, this means that when I get home from work I can colour in the one or two. When I have more time, I can then finish a whole batch of cards off.

See you soon,
Sarah
x

Car Boot Finds

As I am thinking of selling some of my cards at local carboot sales, I thought I would have a look to see what they are like and at the same time have a look around to see if I could spot any bargins for card making. I had in mind buttons or some jewellery that could be used for embellishments.

Well, I did not find any buttons, but one lady had some great old books. The first two are film preview books from 1949 and 1950. There are some great pictures of Jean Simmons and Ava Gardener. I thought that these would be great for cards. I am not quite sure what just yet, but I have distress inks and making some really vintage cards.


The other book I found is a tourist guide to Brighton, Bexhill and Hastings. This one's from 1920. It has some really brilliant old adverts. I think the one below will make an absolutely great father's day card.

I think that I am going to keep a beady eye out for more things like this! When I have made some cards I will show them to you.


Saturday 10 April 2010

Handbag Card

I was inspired by old craft magazine for this card - I can't remember which one! It is quite easy to make.

Cut a 15 x 30 cm card blank and then using a craft knife cut the top right hand corner on a diagonal angle. Choose a bright contrasting paper to really make your card stand out. I have used some free My Mind's Eye papers which were a freebie from one of the card magazines. Line the inside of the card with the paper.

Cut a bag shape and a small square out of the same paper. My small square is 1 x 1 cm.I then cut a oblong out of white card for the little envelope that will poke out of the top of the bag. I have then stuck a sentiment on the envelope.


So you stick the envelope on the card base in the right place, just lay the bag shape on the base and make sure you are happy with how the envelope looks.

Before you stick the bag on the card tape some ribbon for the handle of the bag. Then I used sticky fixers to make the bag stand out from the base.

I have then embellished the bag with a fabric flower, button and some co-ordinating gems. As I had a bit of glue showing around the button, I have used some glitter glue all arond the button.

This card will be great to give to a shopaholic. You could always replace the envelope with a voucher card or actual money!

Friday 9 April 2010

Geisha Card


I like this card it's really quick and simple to make. I made an white A6 card blank, but you could use ready made ones.

I wanted to keep with the pink theme, and used a lovely pink toned sheet from Dovecraft. It's by Kate Knight and is from a pack called Eastern Blooms. Although you can't really see from the photo above, there is grass printed at the bottom. I have highlighted this with some Cosmic Twinkles glitter glue.

The Geisha large bubble sticker is from Poundland - so a complete I probably have enough for 10+ cards.

I wanted to take a closer up photo of the butterflies and the fans. The butterflies are already printed on the paper, but I have stuck gems on them to really make them stand out.
The fans I made using a circular spellbinder die cut. I cut a circle, and then cut the circle into the fan shapes and wrote happy birthday in a fine tip pen. Instead of putting a dot on the i, I stuck a small purple gem on there. I stuck the fans onto the card with sticky foam pads to make it stand out further.
That's pretty much it for this card. The great thing is you get a card finished in around 15 minutes!
I am looking forward to the weekend, when I can spend time creating new things. Although I do need to tidy up my craft room!
Happy crafting,
Sarah
x

Thursday 8 April 2010

Craft for Life Rose Cards

This is the you are special to me card - I love the chintzy paper.

A closer look at the Happy Birthday Rose Card.


Firstly thanks to my husband Rob for helping set up the digital camera! I really need some practise.

I finished 12 of these cards last weekend. I really had a production line going. I really like to craft in two different ways. It really is good to get a production line going. That way you can die cut all of the shapes you need, or print everything and then put all the cards together!

The stamp set I used is from the botanicals range and also raises money for Cancer Research. You can indulge yourself in a new stamp and raise money at the same time - perfect!
The rose is one where you can print different layers of petals and layer them up to get a really great 3D effect, without having to wear funny glasses. I fixed mine together with a brad in the center of the flower.

I coloured my roses in with Papermania's watercolour felt pens. These are a recent purchase and I have to say that I really am not that impressed. The pale pink ran out. I don't know if I just had a bit of a duff pen though...

For the background papers to these cards I used some free My Mind's Eye papers from Cardmaking and Papercraft and some K&Company papers. I used the same papers to die cut circles using spellbinders circles and my Big Shot. I then matted the patterned paper onto green card.
I used co-ordinating card to stamp my sentiments on, and decorated with punched flowers. I then used nail gems (bought from Poundland) as the centers of the flowers. The finishing touch was to use Anita's gems in the top right hand and bottom left hand corners.

All in all I am fairly please with the result and can't wait to send these cards to friends.


Wednesday 7 April 2010

First Post

Hi there and welcome to my blog.

This is my first post on my first ever blog. I am not expecting anyone to read this yet!

I have decided to start this blog as I have been inspired by other crafty bloggers. I suppose what I am really trying to do, is to keep a record of all my crafty thoughts. I have always like arty things - I have not always been successful though! I first got into card making around a year ago when I had to make my wedding invitations to save money.

I am learning new techniques and picking up tips along the way. If I can give ideas to others then that would be great!

I don't know how regularly I will blog. I guess it depends how quickly I can work out all of the blog functions..... although so far so good.

I was reading another lady's blog and she has set herself a challenge of making one card per day. I love this idea, I don't know if I can do this everyday, but I am going to give it a go! I want to learn how to post photos as I made a really cute (and quick) card with some great geisha bubble stickers from Poundland.

Once I have this down I will start to log my daily successes or failures.

If anyone is reading this - goodbye for now.

Sarah
x